

What You’ll Learn
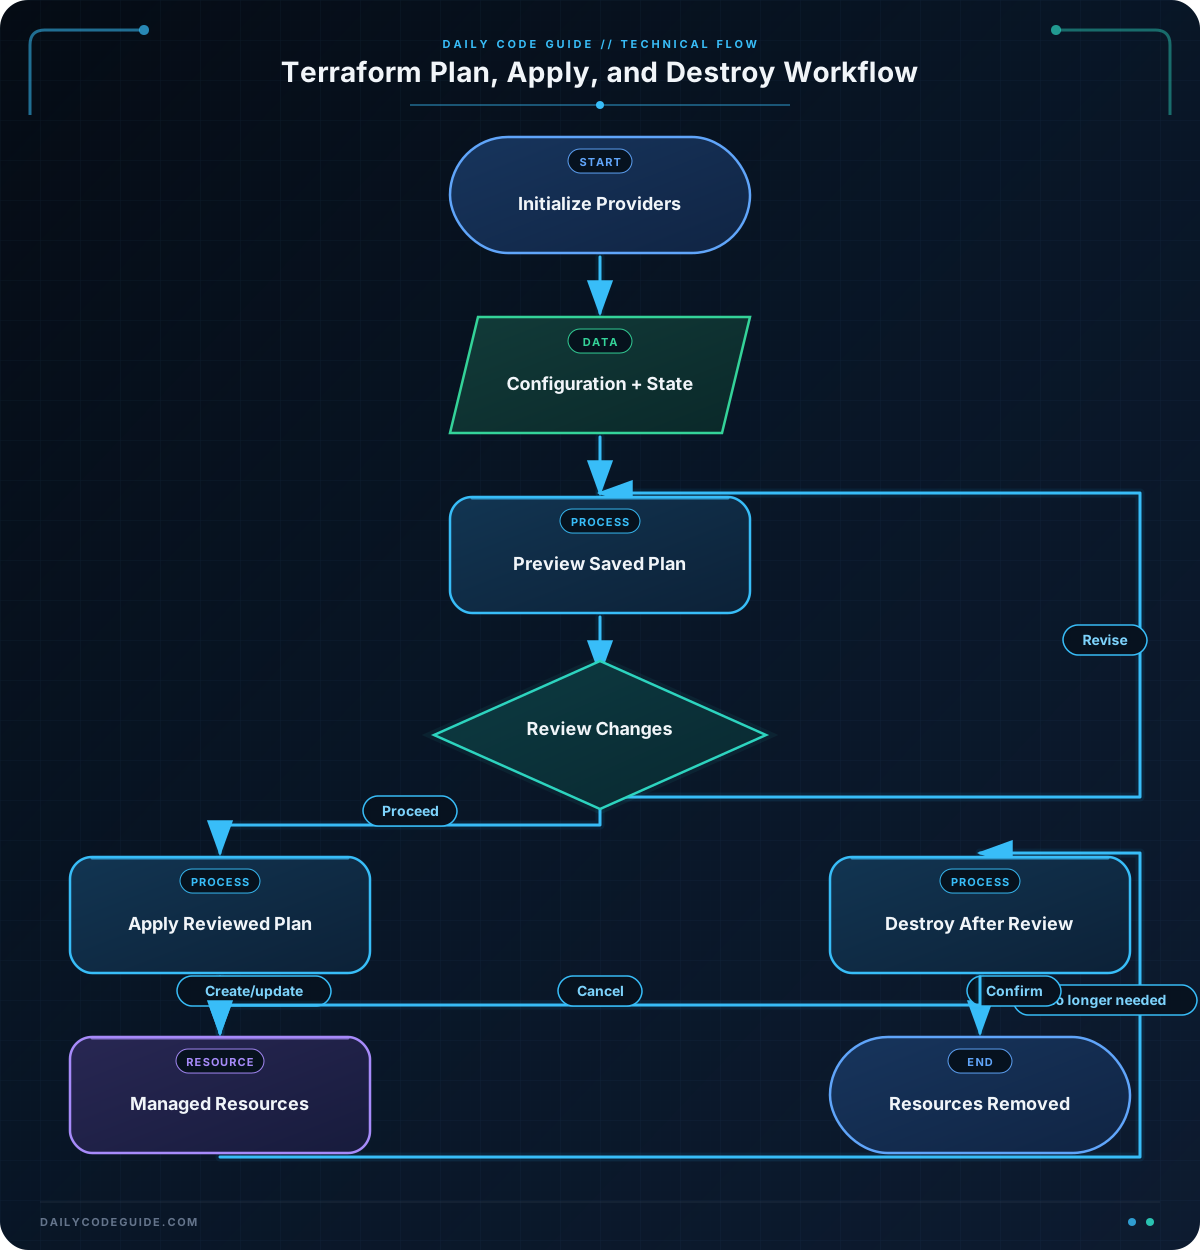
Terraform uses a predictable workflow for managing infrastructure: you preview changes with terraform plan, create or update resources with terraform apply, and remove managed resources with terraform destroy.
- Understand what Terraform plans before making changes.
- Apply a configuration to create a small development environment.
- Review and safely destroy resources that are no longer needed.
- Recognize the role of Terraform state in this workflow.
The Concept
Terraform is a declarative infrastructure-as-code tool. Instead of writing step-by-step instructions such as “create this file, then configure that service,” you describe the desired result in a Terraform configuration.
Terraform compares your configuration with its state and the resources that currently exist. The three main workflow commands are:
terraform plan: Shows what Terraform intends to create, change, or remove. It does not make changes.terraform apply: Executes the proposed changes.terraform destroy: Removes the resources managed by the current configuration.
In this lesson, the development environment is represented by local files. This keeps the example safe to run without cloud credentials or unexpected cloud charges. The same workflow applies when your resources are hosted by AWS, Azure, Google Cloud, or another provider.
Before using these commands, run terraform init. Initialization downloads the providers required by the configuration and prepares the working directory.
Basic Example
Create a new directory and save the following configuration as main.tf. The local provider lets Terraform manage files on your computer.
terraform {
  required_providers {
    local = {
      source  = "hashicorp/local"
      version = "~> 2.5"
    }
  }

  required_version = ">= 1.5.0"
}

provider "local" {}

variable "environment_name" {
  description = "Name of the development environment"
  type        = string
  default     = "development"
}

resource "local_file" "app_config" {
  filename = "${path.module}/dev-environment-app-config.txt"

  content = <<-EOT
    environment=${var.environment_name}
    app_port=8080
    log_level=debug
  EOT
}

resource "local_file" "readme" {
  filename = "${path.module}/dev-environment-README.txt"

  content = <<-EOT
    Development Environment

    Environment: ${var.environment_name}
    Start the application on port 8080.
  EOT
}
Run the commands below from the directory containing main.tf.
terraform init
terraform plan -out=dev-environment.tfplan
terraform apply dev-environment.tfplan
terraform destroy
Terraform will ask for confirmation before applying or destroying changes. Type yes when you have reviewed the proposed action and are ready to continue.
Expected Output
The exact output depends on your Terraform version, but the plan should summarize two resources to create:
Plan: 2 to add, 0 to change, 0 to destroy.After applying, these files should appear in the Terraform directory:
dev-environment-app-config.txtdev-environment-README.txt
After terraform destroy completes, Terraform removes both files because they are resources managed by the configuration.
How the Code Works
The terraform block declares the required local provider. Providers are plugins that allow Terraform to work with a particular system, such as local files, AWS services, or Azure resources.
The provider "local" {} block enables the provider. It has no settings because local file operations do not require credentials or a remote account.
The environment_name variable gives the configuration a reusable value. Its default value is development, so Terraform can run without an additional variable file or command-line argument.
Each resource "local_file" block describes one file that Terraform should manage:
filenameidentifies the file Terraform creates and removes.contentdefines the file contents.${var.environment_name}inserts the variable value into the content.${path.module}refers to the directory containing the current Terraform module.
The -out=dev-environment.tfplan option saves the reviewed plan to a file. Applying that saved plan helps ensure that Terraform applies the changes you just inspected rather than recalculating a different plan.
Terraform also creates a state file named terraform.tfstate. State records which real resources correspond to the resources in your configuration. Do not casually delete or edit it. In team projects, state is commonly stored in a protected remote backend instead of only on a developer’s computer.
For a complementary example of deploying infrastructure and checking a resulting endpoint, see this guide to deploy and verify an API endpoint.
Another Example
The next example uses the same workflow with an AWS S3 bucket. It creates a private bucket for development artifacts and adds a small text object. This example requires AWS credentials, an AWS account, and a globally unique bucket name. Cloud resources can incur charges, so destroy the environment when you finish practicing.
Save this configuration as a separate main.tf file in another directory.
terraform {
  required_providers {
    aws = {
      source  = "hashicorp/aws"
      version = "~> 5.0"
    }
    random = {
      source  = "hashicorp/random"
      version = "~> 3.6"
    }
  }

  required_version = ">= 1.5.0"
}

provider "aws" {
  region = var.aws_region
}

variable "aws_region" {
  description = "AWS region for the development environment"
  type        = string
  default     = "us-east-1"
}

variable "project_name" {
  description = "Short project name used in the bucket name"
  type        = string
  default     = "dcg-dev"
}

resource "random_id" "bucket_suffix" {
  byte_length = 4
}

resource "aws_s3_bucket" "artifacts" {
  bucket = "${var.project_name}-${random_id.bucket_suffix.hex}"

  tags = {
    Environment = "development"
    ManagedBy   = "Terraform"
  }
}

resource "aws_s3_object" "readme" {
  bucket  = aws_s3_bucket.artifacts.id
  key     = "README.txt"
  content = "Temporary development artifacts belong in this bucket."
}
Use the same sequence, but save the plan under a name that identifies this environment:
terraform init
terraform plan -out=aws-dev-environment.tfplan
terraform apply aws-dev-environment.tfplan
terraform destroy
The random identifier makes the bucket name more likely to be globally unique. The object refers to aws_s3_bucket.artifacts.id, so Terraform understands that the bucket must exist before it creates the object. During destruction, Terraform removes the object and then the bucket.
Common Mistakes
Skipping the plan
Running terraform apply directly still creates a plan internally, but reviewing a separate plan first makes the change easier to inspect and discuss. For important environments, save the plan with -out and apply that saved file.
Destroying the wrong directory
Terraform commands operate on the configuration and state in the current directory. Before running terraform destroy, check your current directory and review the resources Terraform says it will remove.
Expecting plan to make changes
terraform plan is a preview. It does not create files, buckets, networks, or other infrastructure. Use terraform apply after reviewing the plan.
Deleting the state file manually
The state file helps Terraform track resources. Deleting it does not reliably remove the resources; it only makes Terraform forget its tracking information. If resources still exist, they may become unmanaged.
Putting secrets in configuration files
Do not place passwords, private keys, or access tokens directly in Terraform code or commit them to source control. For sensitive infrastructure data, learn how to protect sensitive infrastructure data with AWS KMS and use an appropriate secrets-management workflow.
Try It Yourself
Use the first local-file example and make these changes:
- Change the default environment name to
testing. - Change the application port from
8080to3000. - Run
terraform planand confirm that Terraform proposes changes. - Run
terraform applyand inspect the updated files. - Run
terraform destroyand confirm that the files are removed.
For extra safety, you can first validate deployment input in Bash before passing environment names or other values into an automation script.
Challenge
Create a local development environment configuration with three managed files:
- An application configuration file containing the environment name and port.
- A README file explaining how to start the application.
- A ports file listing the application port and a metrics port.
Use a variable named environment_name with a default value of development. Then run terraform init, preview the changes with a saved plan, apply the saved plan, and finally destroy the environment.
Solution
Save the following as main.tf in a new directory:
terraform {
  required_providers {
    local = {
      source  = "hashicorp/local"
      version = "~> 2.5"
    }
  }

  required_version = ">= 1.5.0"
}

provider "local" {}

variable "environment_name" {
  description = "Name of the development environment"
  type        = string
  default     = "development"
}

resource "local_file" "application_config" {
  filename = "${path.module}/challenge-app-config.txt"

  content = <<-EOT
    environment=${var.environment_name}
    app_port=3000
  EOT
}

resource "local_file" "readme" {
  filename = "${path.module}/challenge-README.txt"

  content = <<-EOT
    Development Environment

    Start the application with the configuration in challenge-app-config.txt.
  EOT
}

resource "local_file" "ports" {
  filename = "${path.module}/challenge-ports.txt"

  content = <<-EOT
    application_port=3000
    metrics_port=9090
  EOT
}
Run the complete workflow:
terraform init
terraform plan -out=challenge.tfplan
terraform apply challenge.tfplan
terraform destroy
The plan should report three resources to add. Applying the plan creates the three files, and destroying the environment removes all three resources tracked in the state.
Key Takeaways
terraform planpreviews infrastructure changes without applying them.terraform applycreates or updates resources according to the configuration.terraform destroyremoves resources managed by the current Terraform state.- A saved plan helps you apply the exact changes you reviewed.
- Always check the current directory, plan output, and resource scope before making changes.