

What You’ll Learn
In this lesson, you will use the AWS CLI to create an Amazon Elastic Container Registry (ECR) repository and push a Docker application image to it. You will also authenticate Docker, apply an ECR-compatible tag, and verify that the image was stored.
- Understand what an ECR repository stores.
- Create a repository with the AWS CLI.
- Authenticate Docker with Amazon ECR.
- Tag and push an application image.
- List images stored in a repository.
The Concept
Amazon ECR is a managed registry for container images. A registry is a service that stores and distributes images used by Docker and other container tools.
An ECR repository is a named location for related images. For example, an application might use a repository named inventory-api. Different versions of the application can be stored in the same repository by using different image tags, such as 1.0 or latest.
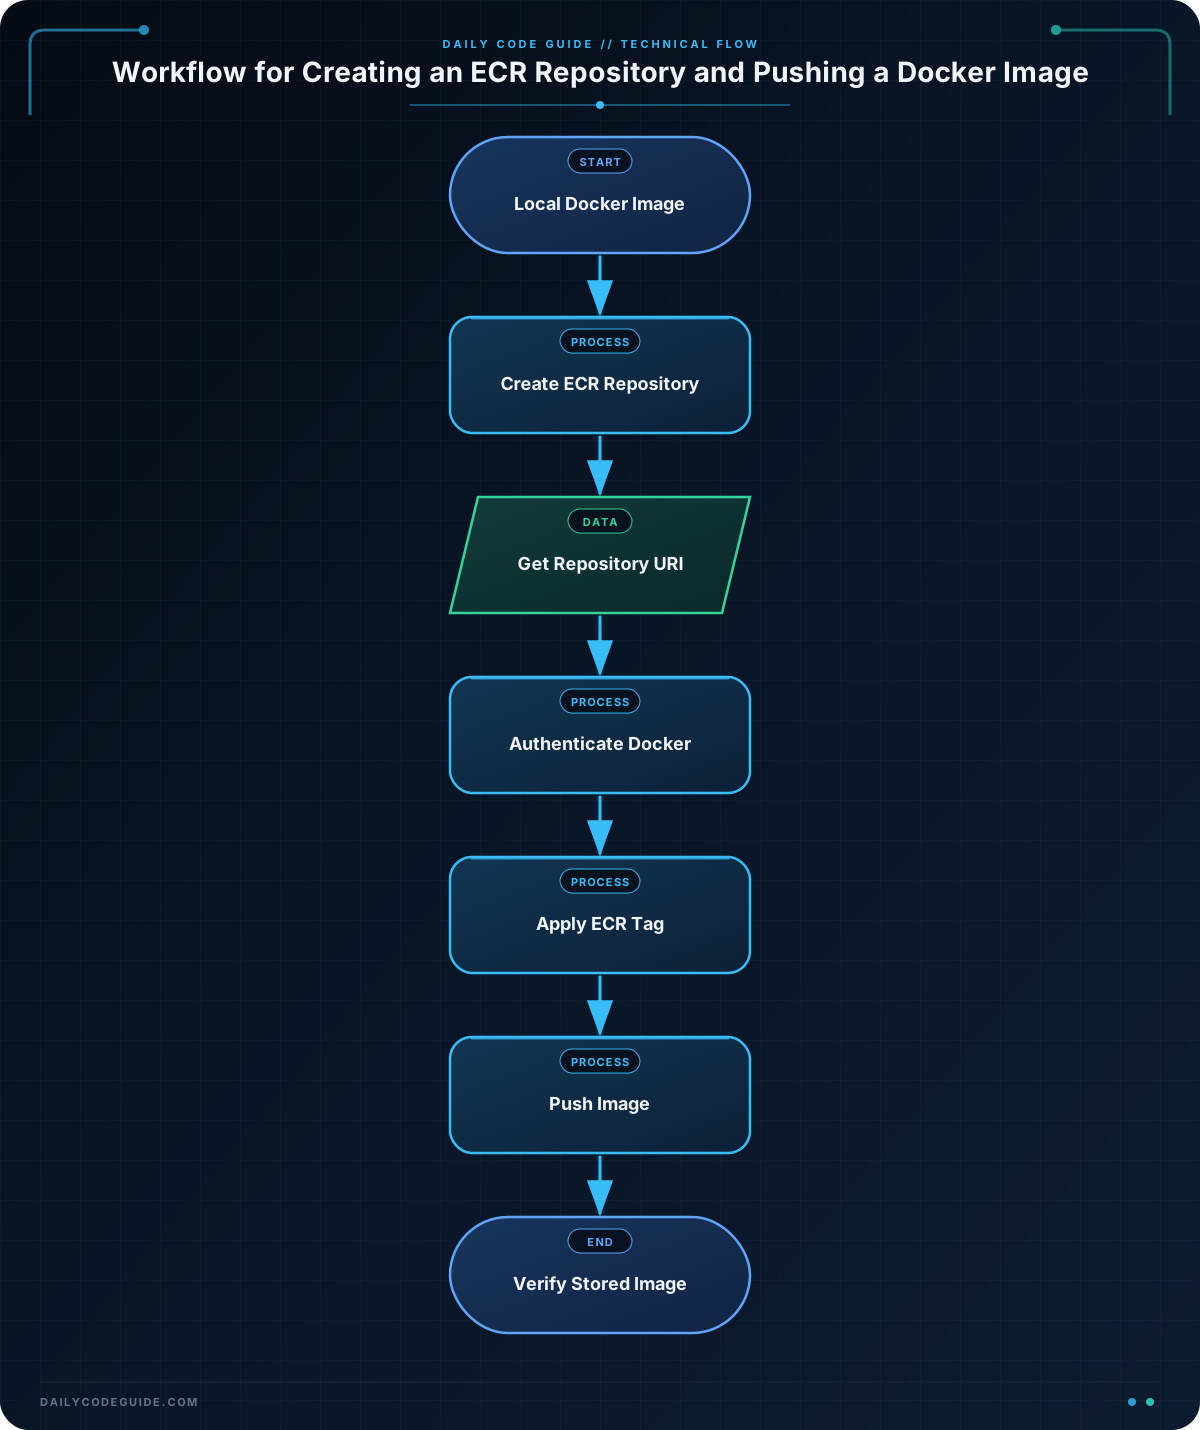
The usual command-line workflow is:
- Create an ECR repository.
- Find the repository’s registry address.
- Log Docker in to the ECR registry.
- Tag a local Docker image with the ECR address.
- Push the tagged image.
- Verify the image with an AWS CLI ECR command.
The AWS CLI manages the AWS-side resources and permissions. Docker builds, tags, and pushes the container image.
Basic Example
Assume you have a Docker application in the current directory and a local Docker image will be built from its Dockerfile. The following Bash commands create an ECR repository named inventory-api and push version 1.0.
AWS_REGION="us-east-1"
REPOSITORY_NAME="inventory-api"
IMAGE_TAG="1.0"

aws ecr create-repository \
    --repository-name "$REPOSITORY_NAME" \
    --region "$AWS_REGION"

ACCOUNT_ID=$(aws sts get-caller-identity \
    --query Account \
    --output text)

REPOSITORY_URI="${ACCOUNT_ID}.dkr.ecr.${AWS_REGION}.amazonaws.com/${REPOSITORY_NAME}"

aws ecr get-login-password \
    --region "$AWS_REGION" | \
    docker login \
    --username AWS \
    --password-stdin "$ACCOUNT_ID.dkr.ecr.$AWS_REGION.amazonaws.com"

docker build \
    --tag "${REPOSITORY_NAME}:${IMAGE_TAG}" \
    .

docker tag \
    "${REPOSITORY_NAME}:${IMAGE_TAG}" \
    "${REPOSITORY_URI}:${IMAGE_TAG}"

docker push \
    "${REPOSITORY_URI}:${IMAGE_TAG}"

aws ecr describe-images \
    --repository-name "$REPOSITORY_NAME" \
    --region "$AWS_REGION" \
    --query 'imageDetails[*].[imageTags,imageDigest]' \
    --output table
Expected Output
The repository creation command returns repository information. The Docker login command should report success, and the push displays upload progress. The final command displays the stored tag and its image digest. The account ID and digest vary by AWS account and image.
Login Succeeded

------------------------------------------------------------------------------
|                             DescribeImages                               |
+-------------------+------------------------------------------------------+
|  ['1.0']          |  sha256:example-image-digest                         |
+-------------------+------------------------------------------------------+
How the Code Works
AWS_REGION, REPOSITORY_NAME, and IMAGE_TAG are Bash variables. Variables make it easier to reuse the same values in several commands.
aws ecr create-repositorycreates the ECR repository in the selected AWS Region.aws sts get-caller-identityreturns information about the AWS identity currently used by the CLI. ItsAccountquery gives the AWS account ID.REPOSITORY_URIcombines the account ID, Region, and repository name. An ECR image address follows this pattern:account-id.dkr.ecr.region.amazonaws.com/repository-name.aws ecr get-login-passwordcreates a temporary authentication password for Docker. The pipe character,|, sends that password todocker loginwithout displaying it as a command argument.docker build --tagbuilds the application image from theDockerfilein the current directory and gives it a local name.docker tagadds a second name to the same local image. The second name includes the ECR repository URI, which tells Docker where the image should be pushed.docker pushuploads the tagged image to ECR.aws ecr describe-imagesreads image metadata from the repository. The query selects image tags and digests, and--output tablemakes the result easier to read.
The image tag is important. Docker uses the registry and repository portion of the tag to determine the destination. If an image is tagged only as inventory-api:1.0, Docker treats it as a local image. The ECR-qualified tag tells Docker to send it to Amazon ECR.
Another Example
Suppose a team has already built a web portal image locally as web-portal:release-2025-01. This example creates a separate repository, obtains its URI directly from ECR, pushes the existing image, and lists only tagged images.
AWS_REGION="us-west-2"
REPOSITORY_NAME="customer-web-portal"
IMAGE_TAG="release-2025-01"

aws ecr create-repository \
    --repository-name "$REPOSITORY_NAME" \
    --region "$AWS_REGION"

REPOSITORY_URI=$(aws ecr describe-repositories \
    --repository-name "$REPOSITORY_NAME" \
    --region "$AWS_REGION" \
    --query 'repositories[0].repositoryUri' \
    --output text)

aws ecr get-login-password \
    --region "$AWS_REGION" | \
    docker login \
    --username AWS \
    --password-stdin "${REPOSITORY_URI%%/*}"

docker tag \
    "web-portal:${IMAGE_TAG}" \
    "${REPOSITORY_URI}:${IMAGE_TAG}"

docker push \
    "${REPOSITORY_URI}:${IMAGE_TAG}"

aws ecr list-images \
    --repository-name "$REPOSITORY_NAME" \
    --region "$AWS_REGION" \
    --filter tagStatus=TAGGED \
    --query 'imageIds[*].imageTag' \
    --output table
In this version, describe-repositories supplies the repository URI instead of building it from the account ID. The Bash expression ${REPOSITORY_URI%%/*} removes the first slash and everything after it, leaving only the registry host for Docker authentication.
The local image must already exist with the name web-portal:release-2025-01. The command does not build that image; it prepares an existing image for delivery to ECR.
Common Mistakes
- Using the wrong Region: ECR repositories exist in a specific Region. Use the same Region when creating the repository, authenticating Docker, pushing, and verifying the image.
- Forgetting the ECR-qualified tag: Pushing
inventory-api:1.0alone does not identify an ECR destination. Tag the image with the complete repository URI first. - Authenticating against the wrong host: Docker login should use the registry host, such as
123456789012.dkr.ecr.us-east-1.amazonaws.com, not the full repository path. - Running the command from the wrong directory: The
docker build .command uses the current directory as its build context. Run it where the application’sDockerfileand required source files are available. - Creating the same repository repeatedly: A repository name must be unique within an AWS account and Region. If it already exists, you can skip the create command and continue with authentication and image operations.
- Missing AWS permissions: The AWS identity needs permission to create or describe repositories and to upload image layers. An
AccessDeniedExceptionindicates an IAM permissions problem rather than a Docker tagging problem.
Try It Yourself
Use a local Docker image named reports-service:0.1. Create an ECR repository named reports-service in the AWS Region of your choice, tag the image with the repository URI, push it, and then use describe-images to verify the 0.1 tag.
Before starting, make sure the local image exists. You can check local images with docker image ls. Replace the Region with one available in your AWS account.
Challenge
Prepare and publish a local image named billing-worker:2.0 to a new ECR repository named billing-worker in us-east-1.
Your solution should:
- Create the repository.
- Authenticate Docker with the ECR registry.
- Apply the ECR repository URI to the local image.
- Push the image with the
2.0tag. - Verify the stored image using an AWS CLI ECR command.
Solution
AWS_REGION="us-east-1"
REPOSITORY_NAME="billing-worker"
IMAGE_TAG="2.0"

aws ecr create-repository \
    --repository-name "$REPOSITORY_NAME" \
    --region "$AWS_REGION"

ACCOUNT_ID=$(aws sts get-caller-identity \
    --query Account \
    --output text)

REPOSITORY_URI="${ACCOUNT_ID}.dkr.ecr.${AWS_REGION}.amazonaws.com/${REPOSITORY_NAME}"

aws ecr get-login-password \
    --region "$AWS_REGION" | \
    docker login \
    --username AWS \
    --password-stdin "$ACCOUNT_ID.dkr.ecr.$AWS_REGION.amazonaws.com"

docker tag \
    "billing-worker:${IMAGE_TAG}" \
    "${REPOSITORY_URI}:${IMAGE_TAG}"

docker push \
    "${REPOSITORY_URI}:${IMAGE_TAG}"

aws ecr describe-images \
    --repository-name "$REPOSITORY_NAME" \
    --region "$AWS_REGION" \
    --query 'imageDetails[*].[imageTags,imageDigest]' \
    --output table
This works because the local image is first given an ECR-qualified name. The authentication command uses the same account and Region as the repository, and the final describe-images command confirms that ECR has stored the pushed image.
Key Takeaways
- An ECR repository is a named AWS location for storing container images.
- Use
aws ecr create-repositoryto create the repository andaws ecr get-login-passwordto authenticate Docker. - Tag a local image with the complete ECR repository URI before pushing it.
- Use
docker pushto upload the image andaws ecr describe-imagesoraws ecr list-imagesto verify it. - Keep the AWS Region consistent across all ECR commands.